Wednesday, April 23, 2008

How do I change the colour of Excel's grid lines?


Above you see Excel sheets with pink gridlines and green gridlines. How do you do that? Watch the screencast below or scroll down for text instructions.


To change the colour of your gridlines, click on the Office Orb and select Excel Options from the bottom right corner of the menu.


With Options now open, locate the Advanced option as shown on the left-hand side of the menu.


Scroll down the page until you come to Display Options. Here you will find a Gridlines colour picker. You can choose to apply the colour to any sheet in your workbook .... you can even have a different colour on each page.


Click OK and you are done. That's all that there is to it.

To change it back to the default, repeat the steps Excel Options > Advanced> Gridline Colour and this time select "automatic" on the colour picker.

Sunday, April 20, 2008

How do I apply themes in Excel 2007?

Applying a theme to an Excel document has never been easier. Example from John Walkenbach's Excel 2007 Bible.

Themes are a quick and simple way to uniformly format your document (see more examples below or view the clip above to explore the possibilities).


To apply a theme, select the Page Layout tab on the Excel 2007 ribbon. The first group of options relate to themes.

Excel comes with several preset themes you can choose from. Browse through these by using the down-arrow on the Themes button.


Simply select the theme that appeals to you or individually apply theme changes using the nearby Colours, Fonts of Effects buttons. You can even create a personal custom theme and save it to your computer for super-swift formatting the next time.

How do I stop text from running into other cells in Excel?

There are a few ways to go about tackling this problem. The simplest method is to use simple text wrapping.


Text wrapping will extend the height of your cell in order to accomadate the text instead of having it run accross the page and into adjacent cells.


To wrap a cell, click into the cell you want to wrap and select the Home tab. Scroll across to the Alignment section. Here you will find the Wrap Text button.

Select it and then you're done! It's as simple as that.

How do I write off bad debts in MYOB?

Writing off bad debts in MYOB involves creating a negative invoice and applying it to the outstanding balance. Care should be taken to adjust for any GST previously recorded. View a video demonstration or scroll down the page for illustrated text instructions.


The example images assume an outstanding invoice to be written off totalling $1,210 GST inclusive.

Step 1: From the Sales command centre, select Enter Sales. You may need to change the invoice layout by selecting the Layout button and opting for a Miscellaneous invoice style.

Step 2: Proceed to fill in details regarding customer and date as you would normally.


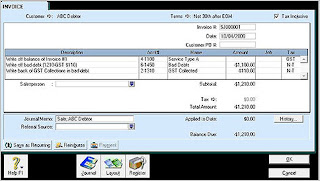
As shown in the above image (click to enlarge), on the first line, you will want to use the income account the sale was first applied to (such as sales or services revenue, etc). Leave the amount field here blank.

Next, you want to record the tax-exclusive amount to the Bad Debts expense. To do this, you will enter the figure as a negative.

Finally, to write back the GST collected, you record the GST portion of the invoice to your GST Collections account as a negative value.
MYOB will warn you that this is not usually the account you would use - ignore the warning box by clicking OK. Record the invoice.

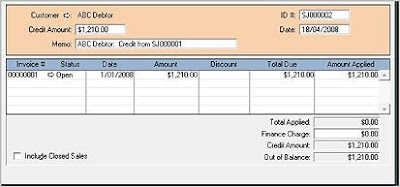
Step 3: From the Sales command centre, select Sales Register. We need to locate the negative invoice we just generated. The Sales and Return tab is usually the quickest way to find it. Select the invoice and click on the "Apply to Sale" button at the bottom of the screen.


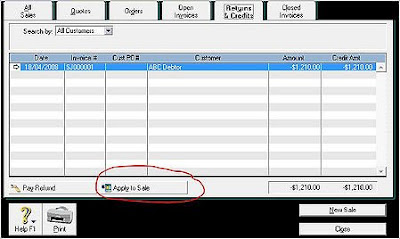
You will be presented with a list of open invoices for this debtor. Enter the amount you are applying (the total of the negative invoice should insert itself by default) and record in order to write of this bad debt.


That's all there is to it! Be sure to check the balance of your accounts afterwards to verify you have recorded everything properly.