Thursday, March 6, 2008

How do I set different page orientations within the one Word document?

Setting different page orientations seems to be a great source of frustration for a lot of people, but it doesn't have to be. To make some pages portrait and others landscape is simply a matter of using the right breaks.

Take a look at the video demonstration below or scroll down for text instructions.


In order to change the orientation of just SOME of our pages, we need section off the area. A common mistake people make is to go after the page break. What we want to do is use a Next Page Section Break.

Position the cursor at the end of the page before the section you want to create. Select the Page Layout tab on your ribbon and click the arrow next to Breaks. Under sections breaks, choose Next Page (see image below). Repeat this process again at the end of the section you are creating.


You should now have three sections. Place your cursor into the section you want to change. Now, change the orientation to landscape (Page Layout >Orientation). If your breaks were set correctly, you should now have some pages as portrait and the rest in landscape view (see below).


This is just one of the practical uses for section breaks. We'll explore more in the coming weeks.


Monday, March 3, 2008

How do I enable text-to-speech in Excel 2007?

I like to multi-task so there are times when having Excel read back to me the values of columns or rows is a great time saver. Of course, this is fabulous option for anyone with accessibility issues too.

Text-to-speech is not available in Word yet, but you can turn it on in Excel. Here's how:


You'll see a little drop-down arrow next to your Quick Access Toolbar. Select this and choose More Commands (see image above).

Excel will open your Excel Options menu. By default, you'll be presented with the Most Popular choices. Change this to choose commands from All Commands. Now just scroll down the list and select the text-to-speech commands you want to add (they all start with Speak as seen below). Add and click OK.


I've found Excel's text-to-speech to be quite clear in reading back everything from dates to plain text to data sets. Now, when you want to use it simply select the command you need from your Quick Access Toolbar.

Sunday, March 2, 2008

How do I change Excel 2007 to save in 97-2003 format by default?

Excel 2007 will save in the default file format. In most cases this will be as an Excel 2007 workbook. This can be really frustrating if you forget to change the file type on saving and realise it won't be compatible to the person you are sending it to.

Fortunately, you can save yourself this aggravation by changing the default save format to 97-2003 if you prefer. To do this, click the main office button and locate Excel Options on the bottom right of the menu (see below).

Select Save from the left side menu. From this panel you can customise how workbooks are saved. The first thing you'll notice is a drop down list next to where it says 'Save files in this format.' (see below). The default Excel Workbook refers to your 2007 version. Scroll down a couple to select 97-2003 Workbook.

Click OK and you are done. Now Excel will automatically save in 97-2003 format by default. Of course, you can change this back again or choose to save an individual workbook in another format at the time of saving.

Saturday, March 1, 2008

How do I refresh all my tabbed pages at once?

If you are like me, you like to load several pages at the same time. If your connection drops out, you don't want to have to refresh each page again. Fortunately, you only have to right click.


Simply right click on any tab. A drop-down menu will appear and you have the option to 'refresh all'. Easy!

How do I change Word's default font?

Users new to Word 2007 will soon realise that the default font is no longer Times New Roman, but has changed to Calibri. It's my understanding that Calibri is best suited to onscreen reading, but not necessarily ideal for printing.

If, for whatever reason, you want to change the default font back to Times New Roman - or anything else for that matter - here's how to go about it.


On the Home tab of the ribbon, click the drop-down arrow near the Font group (as shown above). You'll be presented with the Font menu (below) and can enter your preferred font options.

Once you have the options set (you can see I have selected Times New Roman, regular, 12pt) click the Default button at the bottom left of the box. Word will pop up with a warning box (below) to confirm that you really do want to change the default font to the current selection.


Click Yes to confirm and now you have changed the default font for all future Word documents.

How do I protect my private Word documents?

If you have private information in a Word document, you might want to encrypt and password protect it. To do this, simply select the Main Office button and scroll down to Prepare. From here, select Encrypt Document (see image below).

Word will ask you to put in a password. It is important that you do not lose or forget the password you choose because passwords are not recoverable! Word will promt you to re-enter the password again to confirm.


The next time you (or someone elsle) tries to open this Word document, a password prompt will appear like the one shown below.

No password = no access to the file. It's as simple as that.

How do I add background colours and effects to my Word docs?

Adding background colours and/or effects to liven up your documents is simple.

Background colour: Select the Page Layout tab on your ribbon, locate Page Colour (it's included in the Page Background section). Word 2007 allows you to quickly run your mouse over the colours in order to preview what each will look like on your page before committing to a selection (see below).


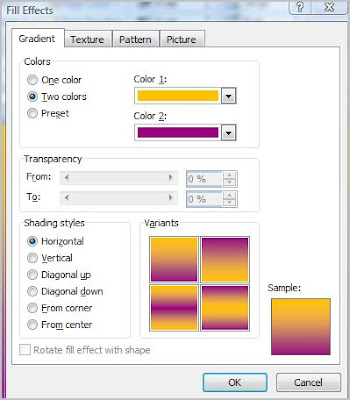
Background Effects: Background effects are just as simple and can really jazz up the appearance of your page. With the page colour menu open, scroll down to Fill Effects. Here you will have several options. I have decided to use a two colour gradient fill (see image below).

You can play around with mixing styles, colours, textures and even images. Select OK when you are happy with your selection and now you have a colour background to your document.