Wednesday, April 23, 2008

How do I change the colour of Excel's grid lines?


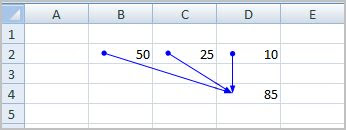
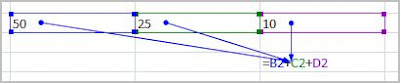
Above you see Excel sheets with pink gridlines and green gridlines. How do you do that? Watch the screencast below or scroll down for text instructions.


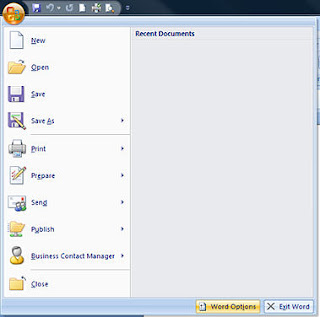
To change the colour of your gridlines, click on the Office Orb and select Excel Options from the bottom right corner of the menu.


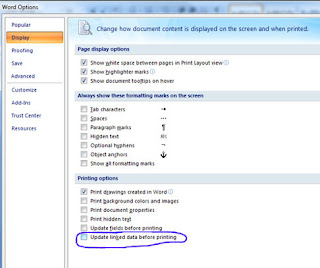
With Options now open, locate the Advanced option as shown on the left-hand side of the menu.


Scroll down the page until you come to Display Options. Here you will find a Gridlines colour picker. You can choose to apply the colour to any sheet in your workbook .... you can even have a different colour on each page.


Click OK and you are done. That's all that there is to it.

To change it back to the default, repeat the steps Excel Options > Advanced> Gridline Colour and this time select "automatic" on the colour picker.

Sunday, April 20, 2008

How do I apply themes in Excel 2007?

Applying a theme to an Excel document has never been easier. Example from John Walkenbach's Excel 2007 Bible.

Themes are a quick and simple way to uniformly format your document (see more examples below or view the clip above to explore the possibilities).


To apply a theme, select the Page Layout tab on the Excel 2007 ribbon. The first group of options relate to themes.

Excel comes with several preset themes you can choose from. Browse through these by using the down-arrow on the Themes button.


Simply select the theme that appeals to you or individually apply theme changes using the nearby Colours, Fonts of Effects buttons. You can even create a personal custom theme and save it to your computer for super-swift formatting the next time.

How do I stop text from running into other cells in Excel?

There are a few ways to go about tackling this problem. The simplest method is to use simple text wrapping.


Text wrapping will extend the height of your cell in order to accomadate the text instead of having it run accross the page and into adjacent cells.


To wrap a cell, click into the cell you want to wrap and select the Home tab. Scroll across to the Alignment section. Here you will find the Wrap Text button.

Select it and then you're done! It's as simple as that.

How do I write off bad debts in MYOB?

Writing off bad debts in MYOB involves creating a negative invoice and applying it to the outstanding balance. Care should be taken to adjust for any GST previously recorded. View a video demonstration or scroll down the page for illustrated text instructions.


The example images assume an outstanding invoice to be written off totalling $1,210 GST inclusive.

Step 1: From the Sales command centre, select Enter Sales. You may need to change the invoice layout by selecting the Layout button and opting for a Miscellaneous invoice style.

Step 2: Proceed to fill in details regarding customer and date as you would normally.


As shown in the above image (click to enlarge), on the first line, you will want to use the income account the sale was first applied to (such as sales or services revenue, etc). Leave the amount field here blank.

Next, you want to record the tax-exclusive amount to the Bad Debts expense. To do this, you will enter the figure as a negative.

Finally, to write back the GST collected, you record the GST portion of the invoice to your GST Collections account as a negative value.
MYOB will warn you that this is not usually the account you would use - ignore the warning box by clicking OK. Record the invoice.

Step 3: From the Sales command centre, select Sales Register. We need to locate the negative invoice we just generated. The Sales and Return tab is usually the quickest way to find it. Select the invoice and click on the "Apply to Sale" button at the bottom of the screen.


You will be presented with a list of open invoices for this debtor. Enter the amount you are applying (the total of the negative invoice should insert itself by default) and record in order to write of this bad debt.


That's all there is to it! Be sure to check the balance of your accounts afterwards to verify you have recorded everything properly.

Thursday, March 6, 2008

How do I set different page orientations within the one Word document?

Setting different page orientations seems to be a great source of frustration for a lot of people, but it doesn't have to be. To make some pages portrait and others landscape is simply a matter of using the right breaks.

Take a look at the video demonstration below or scroll down for text instructions.


In order to change the orientation of just SOME of our pages, we need section off the area. A common mistake people make is to go after the page break. What we want to do is use a Next Page Section Break.

Position the cursor at the end of the page before the section you want to create. Select the Page Layout tab on your ribbon and click the arrow next to Breaks. Under sections breaks, choose Next Page (see image below). Repeat this process again at the end of the section you are creating.


You should now have three sections. Place your cursor into the section you want to change. Now, change the orientation to landscape (Page Layout >Orientation). If your breaks were set correctly, you should now have some pages as portrait and the rest in landscape view (see below).


This is just one of the practical uses for section breaks. We'll explore more in the coming weeks.


Monday, March 3, 2008

How do I enable text-to-speech in Excel 2007?

I like to multi-task so there are times when having Excel read back to me the values of columns or rows is a great time saver. Of course, this is fabulous option for anyone with accessibility issues too.

Text-to-speech is not available in Word yet, but you can turn it on in Excel. Here's how:


You'll see a little drop-down arrow next to your Quick Access Toolbar. Select this and choose More Commands (see image above).

Excel will open your Excel Options menu. By default, you'll be presented with the Most Popular choices. Change this to choose commands from All Commands. Now just scroll down the list and select the text-to-speech commands you want to add (they all start with Speak as seen below). Add and click OK.


I've found Excel's text-to-speech to be quite clear in reading back everything from dates to plain text to data sets. Now, when you want to use it simply select the command you need from your Quick Access Toolbar.

Sunday, March 2, 2008

How do I change Excel 2007 to save in 97-2003 format by default?

Excel 2007 will save in the default file format. In most cases this will be as an Excel 2007 workbook. This can be really frustrating if you forget to change the file type on saving and realise it won't be compatible to the person you are sending it to.

Fortunately, you can save yourself this aggravation by changing the default save format to 97-2003 if you prefer. To do this, click the main office button and locate Excel Options on the bottom right of the menu (see below).

Select Save from the left side menu. From this panel you can customise how workbooks are saved. The first thing you'll notice is a drop down list next to where it says 'Save files in this format.' (see below). The default Excel Workbook refers to your 2007 version. Scroll down a couple to select 97-2003 Workbook.

Click OK and you are done. Now Excel will automatically save in 97-2003 format by default. Of course, you can change this back again or choose to save an individual workbook in another format at the time of saving.

Saturday, March 1, 2008

How do I refresh all my tabbed pages at once?

If you are like me, you like to load several pages at the same time. If your connection drops out, you don't want to have to refresh each page again. Fortunately, you only have to right click.


Simply right click on any tab. A drop-down menu will appear and you have the option to 'refresh all'. Easy!

How do I change Word's default font?

Users new to Word 2007 will soon realise that the default font is no longer Times New Roman, but has changed to Calibri. It's my understanding that Calibri is best suited to onscreen reading, but not necessarily ideal for printing.

If, for whatever reason, you want to change the default font back to Times New Roman - or anything else for that matter - here's how to go about it.


On the Home tab of the ribbon, click the drop-down arrow near the Font group (as shown above). You'll be presented with the Font menu (below) and can enter your preferred font options.

Once you have the options set (you can see I have selected Times New Roman, regular, 12pt) click the Default button at the bottom left of the box. Word will pop up with a warning box (below) to confirm that you really do want to change the default font to the current selection.


Click Yes to confirm and now you have changed the default font for all future Word documents.

How do I protect my private Word documents?

If you have private information in a Word document, you might want to encrypt and password protect it. To do this, simply select the Main Office button and scroll down to Prepare. From here, select Encrypt Document (see image below).

Word will ask you to put in a password. It is important that you do not lose or forget the password you choose because passwords are not recoverable! Word will promt you to re-enter the password again to confirm.


The next time you (or someone elsle) tries to open this Word document, a password prompt will appear like the one shown below.

No password = no access to the file. It's as simple as that.

How do I add background colours and effects to my Word docs?

Adding background colours and/or effects to liven up your documents is simple.

Background colour: Select the Page Layout tab on your ribbon, locate Page Colour (it's included in the Page Background section). Word 2007 allows you to quickly run your mouse over the colours in order to preview what each will look like on your page before committing to a selection (see below).


Background Effects: Background effects are just as simple and can really jazz up the appearance of your page. With the page colour menu open, scroll down to Fill Effects. Here you will have several options. I have decided to use a two colour gradient fill (see image below).

You can play around with mixing styles, colours, textures and even images. Select OK when you are happy with your selection and now you have a colour background to your document.

Friday, February 29, 2008

How do I get the ruler back in Word 2007?


Wondering what happened to the ruler accross the top of your page in Word 2007? In order to show/hide the horizontal ruler, you need to click on the tiny little "view ruler" icon on the right of your document (I've highlight it above).

The vertical rulers should also come on by default, but if not this must be changed through Word Options. To access this select the main Office button>Word Options.

Select Advanced and then scroll down to Display. Here you will notice an option to turn vertical ruler on when in print layout view. Make sure there is a tick next to this.


Now you can turn all your rulers on and off as needed when in print layout simply by clicking the little ruler icon at the top of your right scroll bar.

How do I quickly see which cells I have used in a formula?

Excel 2007 has a few handy functions to find what cell's you have used in a formula. The quickest and simplest method is through the ribbon. On the formulas tab, above the heading Formula Auditing, you'll find Trace Precedents and Trace Dependents.


Precedents affect the value of the currently selected cell.
Dependents are those cells affected by the currently selected cell.


In the example below I have summed the values B2:D2 in cell D4. If I select D4 and click Trace Precedents, Excel will display blue arrows from the cells that affect the formula in this one. This can be a great help when you are dealing with a lot of data on the sheet.


Determining dependents is just as simple. Below, I have select cell A4 and clicked Trace Dependents. A blue arrow appears from A4 to let me know that the formula in B7 is dependent upon this cell.


Tracing cell precedents and dependents can be a great way to view the relationships between values and quickly identify any origiins of errors.

Thursday, February 28, 2008

How do I use Excel's IF function for simple look-ups?

The IF function is a versatile tool in Excel. You can use the IF function for simple lookups, such as returning certain numbers with specified text. Watch the demonstration below to see just how simple it is or scroll down for an overview. Example from John Walkenbach's Excel 2007 Bible.


In the Excel sheet below I have 10 student names in column A and their final marks in column B. To determine the grades in column C, I would type the following into cell C2:


=IF(B2>=50, "PASS", FAIL")


This tells Excel to return the text 'pass' if a student's mark is greater than or equal to 50, otherwise return a 'fail.' Once you have filled in the first cell with your formula, simply fill down the rest of the column.


Excel also allows you to nest IF functions to provide even more choices. In the table above, I have typed into cell c2:


=IF(B2<=49, "FAIL", IF(B2<=74, "GOOD", IF(B2<=84, "GREAT", IF(B2>84, "OUTSTANDING"))))

Wednesday, February 27, 2008

How do I get a large letter at the start of a paragraph in Word?


This is known as a drop cap. You have probably seen drop caps in books and magazines before. Drop caps can be an attractive decorative addition to your page and help to break up the text.

To use drop cap in Word 2007, select the Insert tab on the Word ribbon. Glance across the ribbon until you come to the Text menu options and locate Drop Cap (see image below).


Click the little down arrow in order to bring up the Drop Cap options. You can insert your drop cap dropped into your text (as seen at the top of this post) or place it into the margin area.

You will also notice that you can select Drop Cap Options. This allows you to select the font of your letter, choose how many lines to drop it and how far spaced from the other text you want your drop cap to be.

Have fun playing with the different fonts styles to create very different looks and feels to your documents.

How do I enable check boxes to select files in Vista?


One of my favourite Vista options is the ability to enable checkboxes in order to select files and folders in Explorer. Here's how you do it:

1. Click the Organize button at the top left of your explorer screen and scroll down to select Folder and Search Options (see image below).


2. Click on the View tab and scroll down until you come to the option Use Check Boxes to Select Items. Place a tick next to the option and Apply>Ok.

That's all there is to it! If you would like to see a visual demonstration of this process and the end result, have a look at the video below (my apologies as the audio quality is not as great I would have liked it).


Tuesday, February 26, 2008

How do I ensure Word updates linked data before printing?

I can't tell you how many times I have been typing up a project in Word that has newly changed linked Excel data and I have hit the print button before I update the information in my Word document. It's frustrating to say the least!


To prevent this hapenning, Word 2007 has a great setting you can use to ensure your linked data is updated before printing. If only I had found it sooner.

In Word 2007, click the Office button (that's the big multi-coloured one). At the bottom of the main menu you will notice a button called Word Options (see image below). Click this to bring up your settings.


With Word options now open, look down the left-hand side to select Display. Display options allow you to control how Word presents your document on screen and in print.

Under printing options, place a check in the final option box which says 'Update Linked Data Before Printing.' Select OK.


If you link data into your Word documents, this can be a great option to prevent accidental printing before updates.

How do I copy column widths in Excel?

One of the annoying and time-consuming things about Excel in the past has been the need to set up column widths on each sheet of a workbook. When you copied information accross, the columns widths didn't replicate themselves and you had to format them all over again.

The good news is that those days are over. Excel does allow you to copy and paste your column widths, saving time and keeping everything uniform.

Once you have the columns set up on a sheet you want to have the same widths in other sheets, simply select the columns and copy. Head to the sheet you want to paste those widths into. Instead of the paste command use Paste Special. The Paste Special dialogue box will appear as shown below.


You will notice that there is an option to paste Column Widths. Select this and click OK. Now you can quickly pre-format all the column widths in your worksheet!

How do I revert back to the old pivot table layout?


If you open your Excel 2007 in order to create a Pivot Table, you will no doubt be faced with the new layout (pictured above).

If you feel more comfortable using Excel's familiar pivot table layout, you can alter your settings to show the older style pivot table drag and drop box (pictured below).


To enable the previous version's look, select Pivot Table Tools> Pivot Table Options > Options. When the options box opens, click on the Display tab. Place a check into the box next to Classic Pivot Table Layout.

Now you have all the new functionality with an old faithful look and feel.